I was casually browsing LinkedIn one day when I saw someone post about writing API tests with PactumJS. I was curious since after Chakram and Supertest, I haven’t played much with any api-testing tool in JS – although I’ve worked with Cypress and Playwright both, but I don’t consider them truly api-testing tools.
So I started casually browsing their website, and the documentation – which is pretty basic to be very honest. And then I decided to get my hands dirty.
Features
- Very simple to set up and start writing tests. Minimal efforts required. This is also mentioned in the website.
- Clear and simple API to write readable and maintainable tests that are easy to write.
- Supports component, contract and end-to-end integration tests in a single library.
- Easy to integrate with CI/CD – which is true for almost all libraries now so that is a no surprise.
- Experimental support for Fuzz testing – very curious to know about this.
In this series api tests, I have tried to perform some basic level of tests and then tried with one tests for Fuzz testing too – along with CI/CD and also reporting.
Installation
Since it is a node module, you can simply use the npm package manager to install PactumJS.
npm install pactum
Now you can use Pactum with any JS test runner – let’s say Jest or Mocha. Since I’m familiar more with Mocha, I thought to give it a try.
For our testing, we’ll also use the assertion library chai, faker-js for creating fake data, dotenv to manage the environment variables, mochawesome for reporting, and crypto-js for encrypting the secrets.
So let’s install all of them
npm install chai faker-js dotenv mochawesome crypto-js
Note: Before all of the installation, do a npm init -y in the root of the project to initiate a node project.
First Tests
Now let’s create a new folder named tests in the root of the folder. Inside of this create another folder reqres since we’ll be using https://reqres.in as the base url in the tests inside of this folder.
Now copy this code snippet
const {spec} = require('pactum');
const userUrl = "https://reqres.in/api/users?page=2"

it('should get the user data ', async ()=>{
    await spec()
    .get(userUrl)
    .expectStatus(200);

});
You can also directly pass the url inside the get method . Now let’s take a look into the code.
- The first line tells that we’re importing
specfrom thepactumlibrary – all tests should start withspec - Line 2 is is where we’re creating a
constvariable where we’re putting the desired url that we want to hit. - In the 3rd line, we’re using the
itblock that is provided bymocha– if you’re familiar with thedescribe-itsyntax in JS, this should make sense. - Since
pactumis based on theasync-awaitsyntactic sugar, we make theasynckeyword in the tests. - The spec provides an object to chain request with parameters, headers, cookies, body, files etc. It provides the ability to chain methods- you can chain
nmethods withspec - In the next line, we are fetching user details by using .get(<url>), it makes an HTTP GET request on the provided endpoint and gives us back the response.
- Then we use the inbuilt method
expectStatusto assert that the response code received is 200
Setting Base URL
If there are multiple tests, that use the same baseurl, then you can set the baseurl for all the tests using the request.setBaseUrl method in the tests – let’s see below
const {spec, request} = require('pactum');

request.setBaseUrl('https://reqres.in');   // set the base url

it('should get the user data ', async ()=>{
    await spec()
    .get('/api/users?page=3')
    .expectStatus(200);

});


it('should run the first test with a set baseurl', async()=>{
    await spec()
    .get('/api/users?page=2')
    .expectStatus(200)
});
Once you’ve set the base url, you can now just give the path in the get or post methods in the tests.
Running Tests
Now to run the tests, go to your package.json file in the root of the directory. Under the scripts key, you’ll see the test command.
Remove whatever is inside the test command and copy paste this
mocha ./tests/reqres/*.js
This will make mocha consider all the *.js files inside the /tests/reqres/ directory as tests and those will be run.

Note : My path is /tests/reqres-api/*.js which is printed in the tests. Whatever directory you create inside tests/ is what should be appended after this.
Make a POST call
Now let’s try to make a POST call with some fake data created by using the faker-js library. Now before doing that we want to make our tests detect the url based on the env that we are running right.
So we will use the dotenv package from the node and to use that let’s create a .env file in the root of the project.
In the .env file, let’s add the baseurl of the api as API_BASE_URL

Note : In this image, there are more than one urls, in this .env file, which we will use in subsequent tests.
Now in Pactum for data management, there are templates provided which you can use to create the data and re-use in subsequent tests. One of them is the getDataTemplate. – you can find the documentation here.
You can use the stash.getDataTemplate() to define a data template which you can then pass it in the requests. Let’s see an example
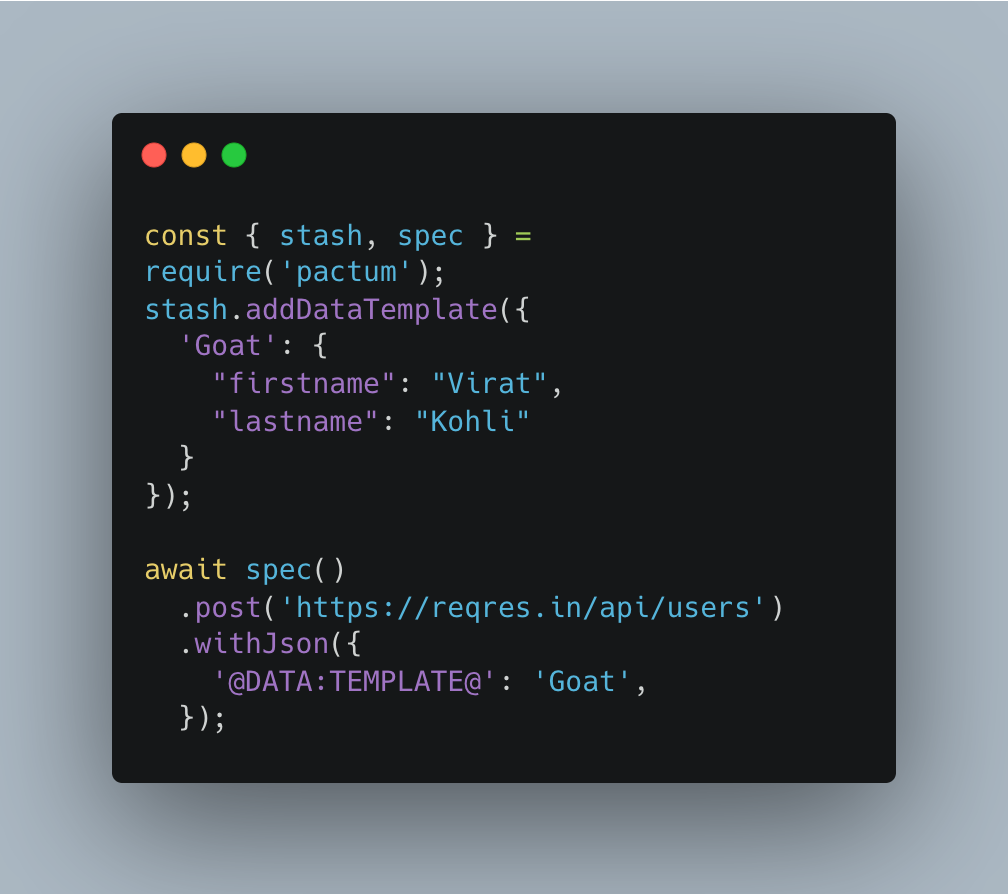
So we will use this templating in our tests

Let’s dissect what we did in this test – the first three lines are the import statements – for using the data templates, we’ve imported stash along with spec and request from pactum.
In the fourth and the fifth lines, we’re setting the baseurl for the tests.
Now comes the part where we’re creating the fake data, and using the getDataTemplate() to store that.
stash.getDataTemplate({
    'NewUser': {
        "name": faker.person.firstName(),
        "job": faker.person.lastName()
    }
});
The template is named NewUser and in the subsequent tests, we can use this template.
it(' creates a new user', async () => {
    await spec()
        .post('/api/users')
        .withJson({
            '@DATA:TEMPLATE@': 'NewUser',
        })
        .inspect()
        .expectStatus(201);
});
As you can see we have use the declared template using @DATA:TEMPLATE@ in our tests. In this way we can use the created data across several tests. Now we can also over-ride the attributes or if we want to ignore any attribute in the data, we can also do that – this can be found here in the documentation.
In our next post, we’ll try to re-use an attribute from the response of an API and also try to run the tests in CI using Github Actions and also try to generate a report.
